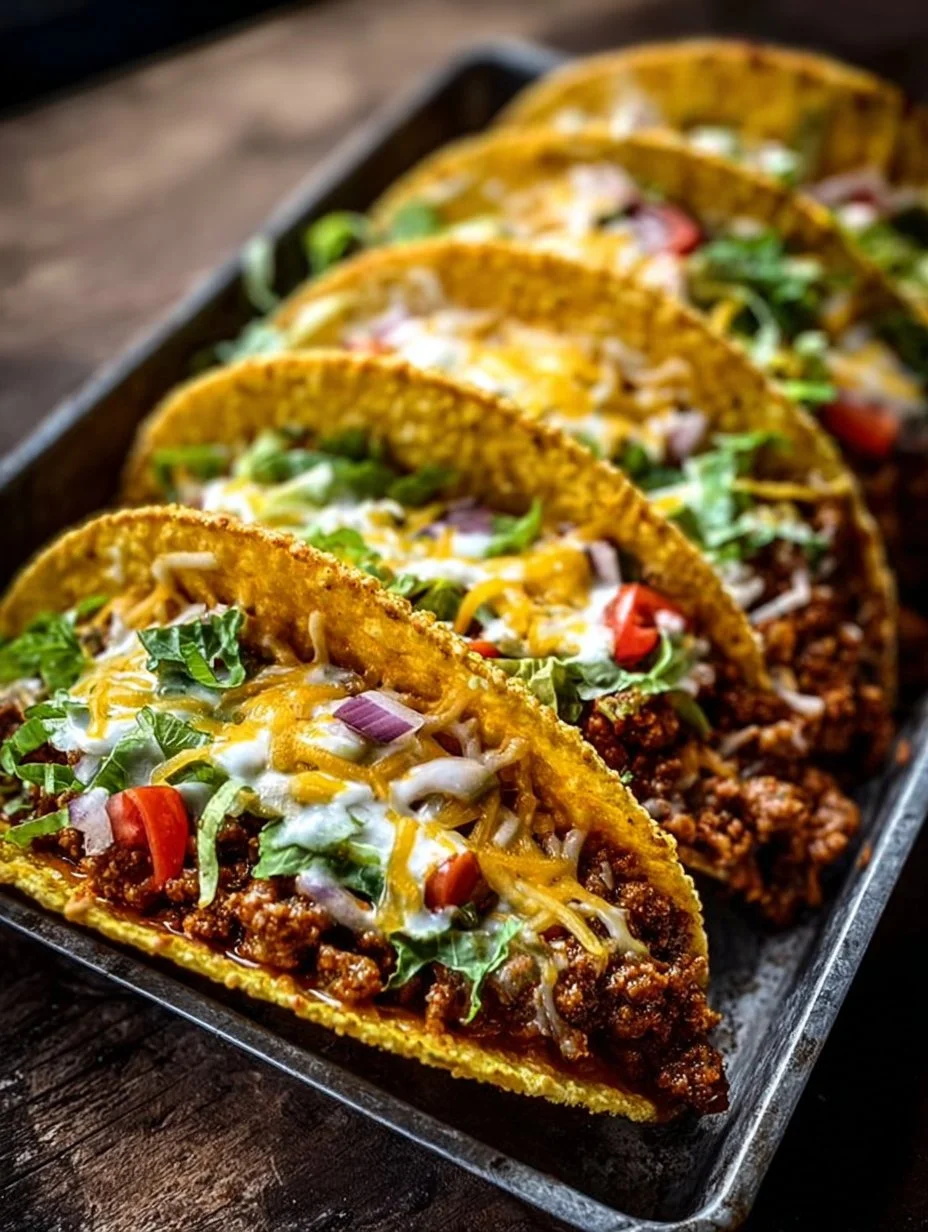
Chef Rita here, and these oven baked cheesy tacos have become my go-to weeknight solution when I want restaurant-quality tacos at home. The secret lies in the baking technique that creates perfectly crispy shells while melting the cheese to silky perfection. Unlike stovetop methods, baking ensures every taco gets evenly heated without any sogginess. The seasoned ground beef stays juicy, the shells turn golden, and the cheese creates that irresistible pull we all crave. What I love most is how this method lets you prepare multiple tacos simultaneously, making it perfect for feeding families or meal prepping. The combination of warm, spiced filling and cool, fresh toppings creates beautiful texture contrast in every bite.
Pro Tips from Chef Rita
- Chef Rita always warms taco shells in a 300°F oven for 2-3 minutes before filling to prevent cracking and ensure maximum crispiness.
- Drain ground beef thoroughly but leave about 1 tablespoon of fat for better flavor and texture in your filling.
- Layer cheese both under and over the meat filling for extra melty goodness that helps hold everything together.
- Add a small pinch of cumin and paprika to store-bought taco seasoning for deeper, more complex flavors that taste homemade.
Table of Contents
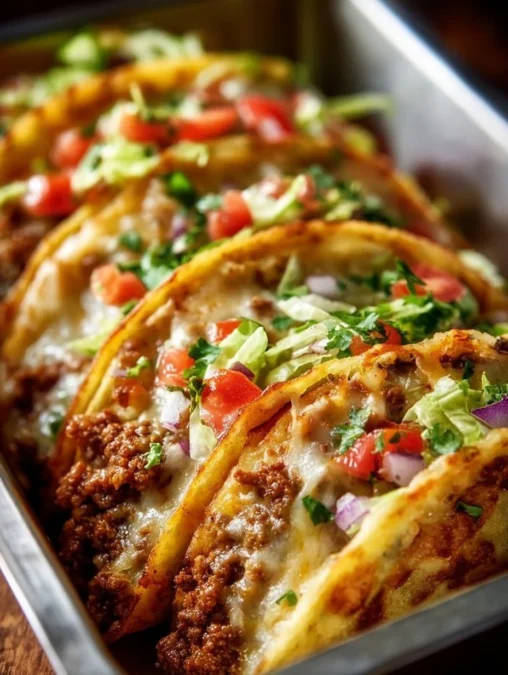
Oven-Baked Cheesy Tacos (Crispy & Loaded) You’ll Love! arrive at the table with a clean crack and a molten, silky interior that melts across the tongue. The contrast between toasted shells and warm, seasoned beef is immediate, brightened by cool lettuce and snap of fresh tomato. The technique is simple: brown, season, cram, and bake, yielding tacos that feel composed yet effortless. For a riff on weeknight ease and layered texture, also see cheesy cabbage casserole in our collection.

Why This Recipe Works
Oven-Baked Cheesy Tacos (Crispy & Loaded) You’ll Love! thrive on texture contrast and staged warmth. A crunchy shell gives way to a silky blanket of cheese and a steaming, spiced meat that keeps each bite juicy. The tomato sauce or salsa ties the protein together, adding a gentle acidity that keeps the mouth watering rather than heavy. Baking the filled shells briefly crisps edges and melts cheese evenly without collapsing the structure, so each taco looks polished and bites right.
Flavor and Texture
A careful balance defines the flavor. The beef is browned until caramel notes develop, then brightened with tomato and warmed taco spices. Garlic and onion provide a savory backbone, while salsa or tomato sauce keeps the filling glossy and tender.
Texture is the story. Crisp shells, molten cheese, and a toothsome meat crumb create layered contrasts. Fresh lettuce introduces a cool, yielding crunch and diced tomato adds a juicy pop that offsets richness. A scattering of cilantro offers a clean herbal lift when used.
The aroma in the kitchen is immediate: buttered corn shells warming in the oven, browned beef releasing toasted scents, and melted cheese giving a sweet, savory perfume. Serve hot so the contrast between warm filling and cool toppings remains distinct and pleasurable.
Convenience and Time
This recipe fits a busy evening. Total hands-on time is short: quick browning, a brief simmer, assembly that takes minutes, and then the oven does the finishing work. A 400°F oven crisps shells and melts the cheese reliably in 10 to 15 minutes, so timing is predictable. Leftovers reheat well, and components such as the seasoned beef can be made ahead to shave time further. The method is forgiving for cooks of any level.
Diet Friendly Options
Swap beef for ground turkey or a plant-based mince to reduce saturated fat while keeping texture. Use low fat cheese or a smaller amount to lighten calories while preserving silkiness. For a lower carb approach, serve the filling over greens or in lettuce cups; the flavor profile remains intact even if the presentation changes. Small adjustments maintain the recipe identity while addressing dietary needs.
Ingredients
- 1 lb (450 g) ground beef
- 1 small onion, finely diced
- 2 cloves garlic, minced
- 1 packet taco seasoning (or homemade mix)
- ⅔ cup tomato sauce or salsa
- Salt & pepper to taste
- 8 hard taco shells
- 2 cups shredded cheese (cheddar, Monterey Jack, or Mexican blend)
- 1 cup shredded lettuce
- ½ cup diced tomatoes
- ¼ cup diced red onion
- 2 tablespoons chopped cilantro (optional)
- Sour cream (optional)
- Guacamole (optional)
- Jalapeño slices (optional)
- Hot sauce (optional)
Step by Step Instructions
- Preheat Oven: Heat oven to 400°F (200°C). Arrange taco shells upright in a baking dish.
- Cook Beef Mixture: In a skillet over medium heat, cook beef and onion until browned. Drain excess fat. Add garlic and taco seasoning; stir for 1 minute. Pour in tomato sauce and simmer for 5 minutes.
- Assemble Tacos: Spoon seasoned beef evenly into taco shells. Sprinkle each generously with shredded cheese.
- Bake: Place baking dish in the oven and bake for 10, 15 minutes, until cheese is melted and shells are crisp and golden.
- Add Fresh Toppings: Remove from oven and top with lettuce, tomato, onion, and cilantro. Serve warm with sour cream or guacamole.
Tips and Tricks for Success
Use moderate heat when browning to develop gentle caramelization without drying the beef, which preserves a supple texture. Drain rendered fat sparingly; a touch of fat improves mouthfeel but too much will make the filling loose in the shell. Warm shells briefly in the oven before filling if they are cold; this prevents the shell from steaming and losing crispness. Distribute cheese evenly so every bite gets a pull of melted silk. For cleaner feeding, line the baking dish with foil and add a shallow rim of sauce to catch any drips.
Ingredient Swaps
Replace ground beef with ground chicken, turkey, or a textured soy product to vary calories and flavor while maintaining structure. Swap tomato sauce for a chunky salsa for brighter, herbaceous notes. Try a sharp white cheddar or a creamy Oaxaca for a different melt and flavor profile. If you prefer a smoky accent, use smoked paprika in the seasoning blend rather than adding liquid smoke.
Pairings and Serving Suggestions
Serve these tacos with a crisp, citrusy slaw to cut richness and add color. A light, limey pickled onion offers acidity and visual contrast. For beverages, choose a sparkling agua fresca or a chilled herbal iced tea to balance the spice and refresh the palate. Finish with a small spoon of guacamole for cream, or a few jalapeño slices for a clean heat that does not overwhelm the layered textures. A simple bowl of rice or beans anchors the plate if you want to make the meal heartier.
Storage and Make Ahead Tips
The seasoned beef stores well in an airtight container for up to three days in the refrigerator. Make the filling ahead and keep shells separate to prevent softening. Assemble and bake just before serving for the best crispness. If reheating assembled tacos, use the oven at 350°F to restore crisp edges without burning toppings. For longer storage, freeze the cooked filling flat in a freezer bag and thaw overnight in the refrigerator before reheating.
Nutrition and Health Benefits
This dish provides protein from ground beef and calcium from cheese while delivering vegetables in the fresh toppings. Choosing leaner beef and modest cheese portions reduces saturated fat. Tomato sauce contributes lycopene and acidity that aids digestion, while cilantro and onion add micronutrients and flavor with negligible calories. For specific dietary needs, please consult a qualified health professional.
Mistakes to Avoid
Avoid overcooking the meat to prevent dryness; simmer briefly in sauce to retain juiciness. Do not overfill shells, which can cause them to break or steam. Resist baking at too high a temperature; the cheese will brown before the shell crisps. Avoid drowning the filling in sauce; the right gloss keeps the texture layered and clean. Finally, add delicate toppings after baking to preserve their crispness and color.
Personal Closing Thought and Call to Action
Oven-Baked Cheesy Tacos (Crispy & Loaded) You’ll Love! reward small, intentional choices: a good sear, measured sauce, and the right cheese. If you try this method, notice the way contrast defines comfort. Share your version, a tweak, or a topping swap so we can refine the simple joy of a perfectly baked taco.
Conclusion
Oven-Baked Cheesy Tacos (Crispy & Loaded) You’ll Love! make a quiet, reliable statement on weeknight menus, delivering crisp edges, molten cheese, and a bright finish from fresh toppings. For another take on baked, cheesy handhelds, consider the inspiration behind a similar technique at Oven-Baked Cheesy Tacos (Crispy & Loaded) You’ll Love!
FAQ
What is the preparation time for this recipe?
The preparation time usually takes about 15 to 20 minutes depending on experience and equipment.
Can I substitute any ingredients?
Yes, simple substitutions are possible depending on dietary needs or availability. Ground turkey or plant-based alternatives work well while preserving the layered textures of the tacos.
Is this recipe suitable for specific diets?
Oven-Baked Cheesy Tacos (Crispy u0026amp; Loaded) You’ll Love! can be adapted with small changes depending on preferences, such as using lean protein, dairy alternatives, or lettuce wraps for lower carbohydrates.
How should leftovers be stored?
Store leftovers in an airtight container in the refrigerator and consume within two to three days.
Can I prepare this recipe in advance?
Many steps can be prepared ahead of time to simplify busy cooking days.
Oven-Baked Cheesy Tacos (Crispy & Loaded)
Enjoy crispy taco shells filled with seasoned beef and melted cheese, topped with fresh lettuce and tomatoes.
Total Time: 30 minutes
Yield: 4 servings 1x
Ingredients
Scale
- 1 lb (450 g) ground beef
- 1 small onion, finely diced
- 2 cloves garlic, minced
- 1 packet taco seasoning (or homemade mix)
- ⅔ cup tomato sauce or salsa
- Salt & pepper to taste
- 8 hard taco shells
- 2 cups shredded cheese (cheddar, Monterey Jack, or Mexican blend)
- 1 cup shredded lettuce
- ½ cup diced tomatoes
- ¼ cup diced red onion
- 2 tablespoons chopped cilantro (optional)
- Sour cream (optional)
- Guacamole (optional)
- Jalapeño slices (optional)
- Hot sauce (optional)
Instructions
- Preheat Oven: Heat oven to 400°F (200°C). Arrange taco shells upright in a baking dish.
- Cook Beef Mixture: In a skillet over medium heat, cook beef and onion until browned. Drain excess fat. Add garlic and taco seasoning; stir for 1 minute. Pour in tomato sauce and simmer for 5 minutes.
- Assemble Tacos: Spoon seasoned beef evenly into taco shells. Sprinkle each generously with shredded cheese.
- Bake: Place baking dish in the oven and bake for 10, 15 minutes, until cheese is melted and shells are crisp and golden.
- Add Fresh Toppings: Remove from oven and top with lettuce, tomato, onion, and cilantro. Serve warm with sour cream or guacamole.
Notes
For a healthier twist, swap beef for ground turkey or a plant-based mince. Use low fat cheese to reduce calories.
- Prep Time: 15 minutes
- Cook Time: 15 minutes
- Category: Main Course
- Method: Baking
- Cuisine: Mexican
- Diet: Flexitarian
Nutrition
- Serving Size: 1 taco
- Calories: 350
- Sugar: 5g
- Sodium: 400mg
- Fat: 12g
- Saturated Fat: 4g
- Unsaturated Fat: 6g
- Trans Fat: 0g
- Carbohydrates: 45g
- Fiber: 3g
- Protein: 15g
- Cholesterol: 30mg
Frequently Asked Questions
How long do you bake cheesy tacos in the oven?
Bake assembled tacos at 400°F for 10-15 minutes until cheese melts completely and shells turn golden brown. Check at 10 minutes to prevent over-browning.
Can I make oven baked tacos ahead of time?
Prepare the seasoned beef filling up to 3 days ahead and refrigerate. Assemble tacos just before baking for crispy shells and best texture.
What cheese works best for baked tacos?
Sharp cheddar, Monterey Jack, or Mexican blend cheeses work perfectly. These varieties melt smoothly and provide great flavor without becoming greasy when baked.
How do you keep taco shells from breaking when baking?
Warm shells briefly in a 300°F oven before filling, avoid overstuffing, and use a baking dish that supports the shells upright during baking.
Can I freeze leftover taco meat for later?
Yes, cooked seasoned beef freezes well for up to 3 months. Cool completely, store in freezer bags, and thaw overnight before reheating and assembling fresh tacos.
Final Thoughts
These oven baked cheesy tacos prove that simple techniques often yield the most satisfying results. The hands-off baking method gives you time to prep fresh toppings while the oven works its magic. If you enjoyed this easy baked approach, you’ll love our Buffalo White Bean Tacos for a vegetarian twist with similar crispy textures. For another family-friendly baked dish, try our Angel Chicken and Rice Casserole that delivers the same comfort food satisfaction. Happy cooking!