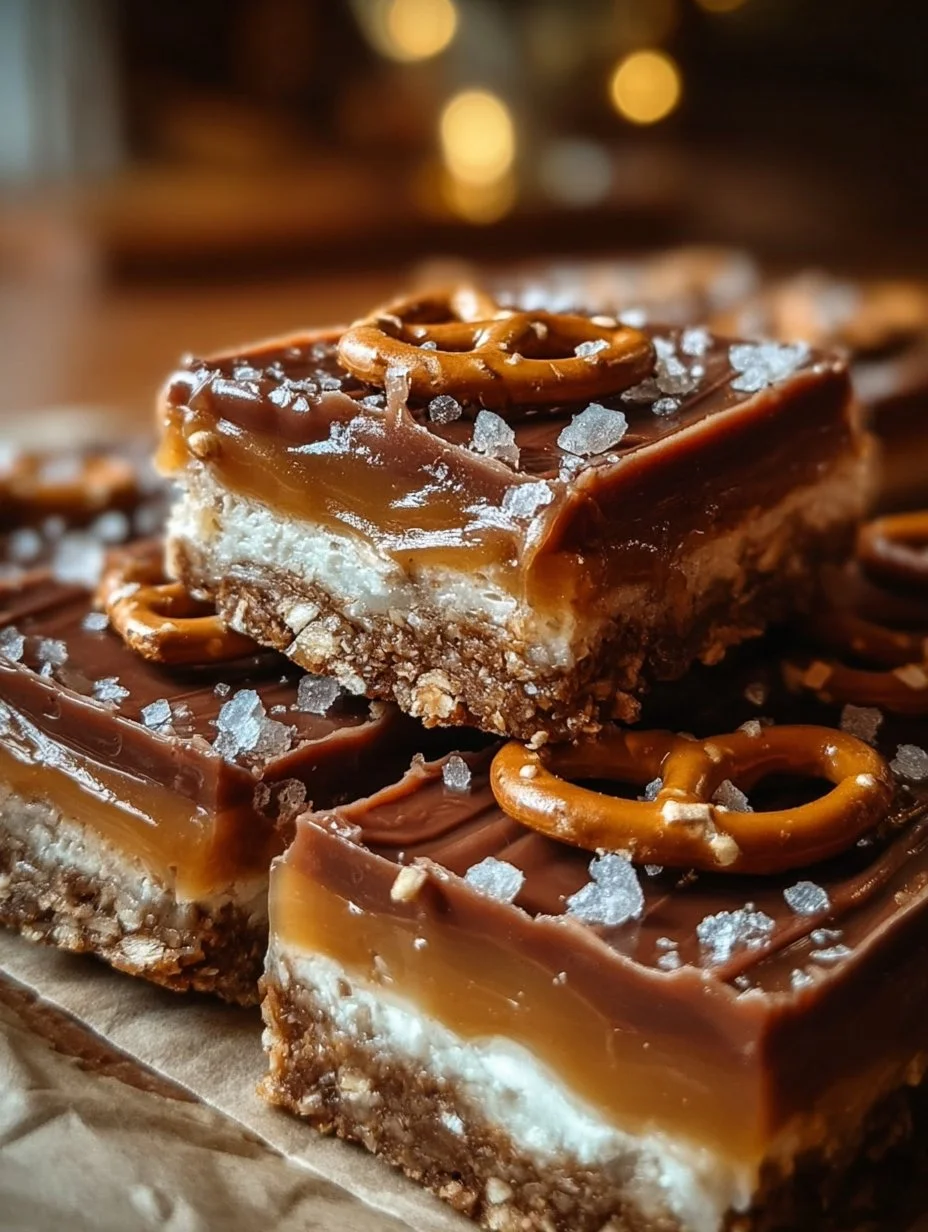
No bake salted caramel pretzel bars deliver pure texture contrast in every bite. The crispy pretzel base gives way to silky caramel, then finishes with cool whipped cream that lingers on the palate. Chef Rita loves these bars because they require zero oven time and come together in minutes. The magic happens during chilling, when each layer sets into place. Three simple components create sophisticated layering: compressed pretzels, smooth caramel, and stabilized whipped topping. This no bake approach keeps your kitchen cool and stress-free. The salt from both pretzels and finishing sea salt amplifies the caramel’s depth, preventing any cloying sweetness. You’ll find that most of your time is passive chilling rather than active work. These bars are perfect for entertaining because you can assemble them ahead and keep them refrigerated until serving. The result feels elegant yet comes from the easiest possible method.
Pro Tips from Chef Rita
- Use a food processor to make fine, uniform pretzel crumbs that bind smoothly with butter and create a tidy, firm base layer.
- Don’t overheat store-bought caramel; if it’s too thin it soaks into the crust and if too thick it won’t spread evenly. Cool it slightly if needed before spreading.
- Chill your mixing bowl and beaters before whipping cream to speed up the process and improve structure and stability.
- Use a sharp knife wiped clean between cuts for neat, professional-looking squares that showcase all three layers.
Table of Contents
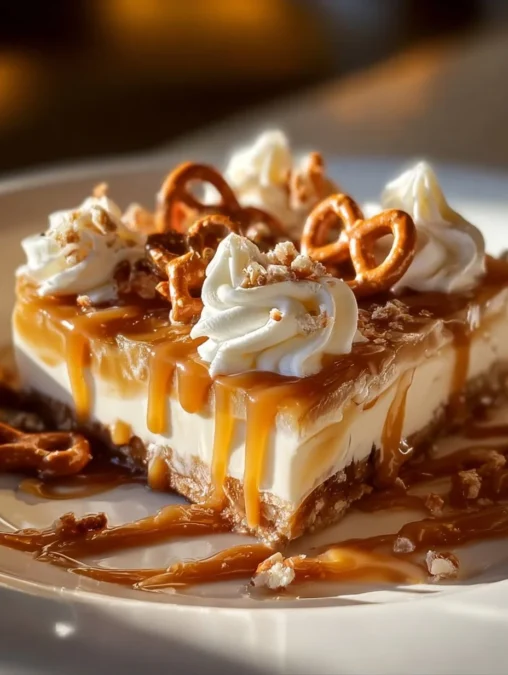
No-Bake Salted Caramel Pretzel Bars arrive as a compact affair of salt, sweet and clean textures, each bite moving from crisp to silky to airy. The contrast is immediate: a crunch that yields to glossy caramel and finishes with a cool, vanilla-whipped top that lingers on the palate. If you enjoy layered contrasts in desserts, try caramel apple cheesecake bars for a similar interplay of textures and temperature. Chill, slice and serve; the assembly is calm, the result quietly sophisticated.

Why This Recipe Works
No-Bake Salted Caramel Pretzel Bars work because three clean elements are held in tension: a compressed pretzel base, a fluid caramel middle and a stabilized whipped topping. Each element brings a different mouthfeel, making every forkful complete and satisfying without any baking drama. The simplicity of ingredients lets texture and seasoning take the lead, while chilled assembly keeps flavors bright and the bars neat to slice.
Flavor and Texture
The pretzel crust gives an immediate crackle and a toasted wheat note that feels almost savory against the caramel. Salt from the pretzels and the finishing sea salt heighten the sweetness, framing the caramel so it reads as glossy and deep rather than cloying.
The caramel sits thick and shiny, spreading a warm, brown-sugar aroma across the plate even when cold. Its movement is restrained; it should spread slightly when you press a fork, offering a silky ribbon that contrasts the brittle base.
The whipped topping is pure contrast: airy, cool and lightly sweetened with vanilla. It softens the caramel’s intensity and adds a creamy lift, so the final texture is layered rather than competing, and the overall impression is refined and comforting.
Convenience and Time
No-Bake Salted Caramel Pretzel Bars are designed for easy staging: build the crust, pour the caramel, whip the cream and chill. Prep time is minimal; most of the waiting is passive chilling, which gives you time to prepare accompaniments or set the table. There is no oven preheat, no tempering and no complex equipment required.
Because steps are straightforward you can assemble the bars an afternoon ahead and keep them chilled until serving, which makes them ideal for casual dinner parties or relaxed holidays. Clean slices come from a chilled pan and a sharp knife wiped between cuts.
Diet Friendly Options
You can adapt these bars without altering their identity: use a plant-based cream substitute whipped with a stabilizer for a vegan finish, or swap the butter for a dairy-free alternative in the crust. Reduce sugar in the crust slightly if you prefer the caramel to read sweeter, or choose a low-sugar caramel to lower total sugar. For nut-free kitchens, verify that pretzels and caramel contain no cross-contact with tree nuts.
Ingredients
For the Pretzel Crust:
- 2 cups pretzel crumbs (crushed pretzels),
- 1/2 cup unsalted butter, melted,
- 1/4 cup granulated sugar,
For the Caramel Layer:
- 1 cup caramel sauce (store-bought or homemade),
- 1/2 teaspoon sea salt,
For the Creamy Topping:
- 1 cup heavy cream,
- 1/2 cup powdered sugar,
- 1 teaspoon vanilla extract
Step by Step Instructions
Follow these simple steps to create your No-Bake Salted Caramel Pretzel Bars:
-
Prepare the Pretzel Crust: In a medium bowl, combine pretzel crumbs, melted butter, and granulated sugar. Mix until well combined. Press the mixture firmly into the bottom of a greased 9×9-inch baking dish to form an even layer.
-
Layer the Caramel: Drizzle the caramel sauce over the pretzel crust. Use a spatula to spread it evenly. Sprinkle the sea salt on top of the caramel layer.
-
Make the Creamy Topping: In a large mixing bowl, whip the heavy cream until soft peaks form. Gradually add powdered sugar and vanilla extract, continuing to whip until stiff peaks form.
-
Assemble the Bars: Spread the whipped cream mixture over the caramel layer in the baking dish, smoothing it out to create an even top layer.
-
Chill: Cover the dish with plastic wrap and refrigerate for at least 2 hours or until the bars are firm and set.
-
Slice and Serve: Once chilled, remove from the refrigerator. Cut into squares and serve.
Tips and Tricks for Success
Use a food processor or a sturdy zip-top bag and rolling pin to make fine pretzel crumbs; a uniform crumb binds more cleanly with butter and presses into a tidy base. Don’t over-heat store-bought caramel if too thin it will soak into the crust; if too firm it won’t spread smoothly. Chill long enough; firm set makes the clean slices that carry the visual contrast.
A light sprinkle of coarse sea salt across the caramel just before topping draws out caramel notes; apply it sparingly so it accentuates without dominating. For the whipped layer, chill the bowl and beaters briefly to speed whipping and improve structure.
Ingredient Swaps
Swap heavy cream for a stable whipped coconut cream if you need a dairy-free version, keeping in mind the topping will be denser and a touch coconutty. For the crust, gluten-free pretzels work well; replace them cup-for-cup and press firmly to ensure binding. If you prefer a softer base, reduce butter by a tablespoon and increase pressure when compacting the crust.
For caramel, a homemade sauce lets you control sweetness and thickness; a slightly cooler caramel holds shape better during slicing. Any swap should maintain the same visual contrast to keep the dessert recognizably composed.
Pairings and Serving Suggestions
Serve chilled squares with a small glass of lightly brewed coffee or a nut-milk latte to balance sweet density. A single crisp apple slice or a few fresh berries offers a bright counterpoint to the bars’ richness and keeps the plate visually simple. Choose neutral ceramics and minimal decor so the layers read clearly on the table.
For gatherings, arrange bars on a slate or marble slab with a small bowl of extra caramel for drizzling at the table. If you want to echo the bars’ fruit notes, pair with an apple-based companion like apple caramel delights to create a cohesive dessert selection.
Storage and Make Ahead Tips
Store bars in an airtight container in the refrigerator for up to three days; they are best within the first 48 hours when the crust retains a crisp bite. If you need to make them earlier, assemble to the caramel layer and add the whipped topping on the day of serving to keep the textures distinct. Freeze individual squares briefly wrapped for transport, but thaw completely in the refrigerator before serving.
Nutrition and Health Benefits
These bars are rich and calorie-dense, driven by butter, cream and caramel; they offer quick energy and a satisfying mouthfeel rather than significant micronutrients. Using whole-ingredient caramel and higher-quality cream keeps flavors pure so you need less by weight to feel satisfied. For specific dietary needs, please consult a qualified health professional.
Mistakes to Avoid
Pressing the crust too loosely results in crumbs that fall apart when cutting; use firm, even pressure and a straight-sided pan for neat edges. Over-whipping the cream can cause graininess; stop at firm peaks. Applying salt before the caramel has set can cause uneven salt distribution sprinkle after spreading the caramel but before the cream layer.
Avoid very thin caramel that soaks into the crust and blunts the contrast; if your caramel is runny, cool it slightly or refrigerate briefly before spreading. Finally, use a clean, hot knife wiped between cuts for the cleanest squares.
Personal Closing Thought and Call to Action
No-Bake Salted Caramel Pretzel Bars are an exercise in restraint: limited ingredients, clear contrasts and minimal fuss. They reward patience at the chilling stage and invite small, attentive bites rather than large, rushed mouthfuls. Try the recipe once and you’ll find a dependable dessert that reads as thoughtful and well composed.
Conclusion
No-Bake Salted Caramel Pretzel Bars make an elegant, low-effort centerpiece for evenings when you want a dessert with texture and poise; for an alternate take and additional tips, see no bake salted caramel pretzel bars –. running with spoons.
FAQ
What is the preparation time for this recipe?
The preparation time usually takes about 15 to 20 minutes depending on experience and equipment.
Can I substitute any ingredients?
Yes, simple substitutions are possible depending on dietary needs or availability; for example, you can adapt No-Bake Salted Caramel Pretzel Bars with dairy-free cream and a gluten-free pretzel to retain the same layered identity.
Is this recipe suitable for specific diets?
This recipe can be adapted with small changes depending on preferences.
How should leftovers be stored?
Store leftovers in an airtight container in the refrigerator and consume within two to three days.
Can I prepare this recipe in advance?
Many steps can be prepared ahead of time to simplify busy cooking days.
No-Bake Salted Caramel Pretzel Bars
These No-Bake Salted Caramel Pretzel Bars feature a crunchy pretzel crust, a rich caramel layer, and a light, whipped topping for an elegant dessert experience.
Total Time: 120 minutes
Yield: 12 servings 1x
Ingredients
Scale
- 2 cups pretzel crumbs (crushed pretzels)
- 1/2 cup unsalted butter, melted
- 1/4 cup granulated sugar
- 1 cup caramel sauce (store-bought or homemade)
- 1/2 teaspoon sea salt
- 1 cup heavy cream
- 1/2 cup powdered sugar
- 1 teaspoon vanilla extract
Instructions
- Prepare the Pretzel Crust: In a medium bowl, combine pretzel crumbs, melted butter, and granulated sugar. Mix until well combined. Press the mixture firmly into the bottom of a greased 9×9-inch baking dish to form an even layer.
- Layer the Caramel: Drizzle the caramel sauce over the pretzel crust. Use a spatula to spread it evenly. Sprinkle the sea salt on top of the caramel layer.
- Make the Creamy Topping: In a large mixing bowl, whip the heavy cream until soft peaks form. Gradually add powdered sugar and vanilla extract, continuing to whip until stiff peaks form.
- Assemble the Bars: Spread the whipped cream mixture over the caramel layer in the baking dish, smoothing it out to create an even top layer.
- Chill: Cover the dish with plastic wrap and refrigerate for at least 2 hours or until the bars are firm and set.
- Slice and Serve: Once chilled, remove from the refrigerator. Cut into squares and serve.
Notes
For best results, chill the cream and the bowl before whipping to improve structure.
- Prep Time: 20 minutes
- Cook Time: 0 minutes
- Category: Dessert
- Method: No-Bake
- Cuisine: American
- Diet: Vegetarian
Nutrition
- Serving Size: 1 square
- Calories: 300
- Sugar: 25g
- Sodium: 200mg
- Fat: 20g
- Saturated Fat: 10g
- Unsaturated Fat: 8g
- Trans Fat: 0g
- Carbohydrates: 40g
- Fiber: 1g
- Protein: 2g
- Cholesterol: 30mg
Frequently Asked Questions
Can you make no bake salted caramel pretzel bars ahead of time?
Yes, assemble the bars up to the caramel layer one day ahead. Store the pretzel crust covered in the refrigerator. Add the whipped cream topping the day of serving to keep textures distinct and prevent the crust from becoming soggy. This makes entertaining stress-free.
How long do these no bake bars stay fresh?
Store finished bars in an airtight container in the refrigerator for up to three days. They taste best within the first 48 hours when the pretzel crust retains its crisp bite. Beyond that, the base begins to soften from moisture absorption.
What can you substitute for heavy cream in this no bake recipe?
Whipped coconut cream works well for a dairy-free version, though it will be slightly denser and have a subtle coconut flavor. Stabilize it with a cornstarch slurry to maintain structure. Keep the ratio the same as the original heavy cream for best results.
Why are my no bake bars difficult to slice?
Ensure the bars are fully chilled for at least 2 hours before slicing. Use a sharp knife and wipe it clean between each cut. If the caramel layer is too thin or warm, it won’t hold the slice together. A slightly cooler caramel before spreading improves slicing.
Can you use homemade caramel for these bars?
Absolutely. Homemade caramel lets you control sweetness and thickness for perfect results. Make it slightly thicker than store-bought and cool it to room temperature before spreading. This prevents it from soaking into the pretzel base while keeping all three layers clearly defined.
Final Thoughts
No bake salted caramel pretzel bars prove that restraint and quality ingredients create memorable desserts. This recipe rewards patience and celebrates texture contrast. When you’re craving sophisticated no bake options, try our gluten-free chocolate mousse cake for another elegant layered dessert. For a complementary salty-sweet pairing, Chef Rita recommends salted honey pistachio cookies alongside these bars at your next gathering.