I love making Healthy Homemade Thin Mint Cookies. They’re super simple and always remind me of my childhood favorites. You’ll enjoy a delightful combination of cool peppermint and rich chocolate. This recipe highlights clean ingredients, so each bite is refreshing and satisfying. With just a few steps, you can create these crispy delights at home. Trust me, you’ll want to keep them stocked in your kitchen for whenever that craving hits!
Pro Tips from Chef Rita
- Keep your dough cold for easier handling and even rolling.
- Using fine cocoa powder ensures a smooth texture and deep flavor.
- Don’t skip cooling the cookies after baking, it’s essential for their structure.
- Use a fork to dip for a uniform coating of chocolate.
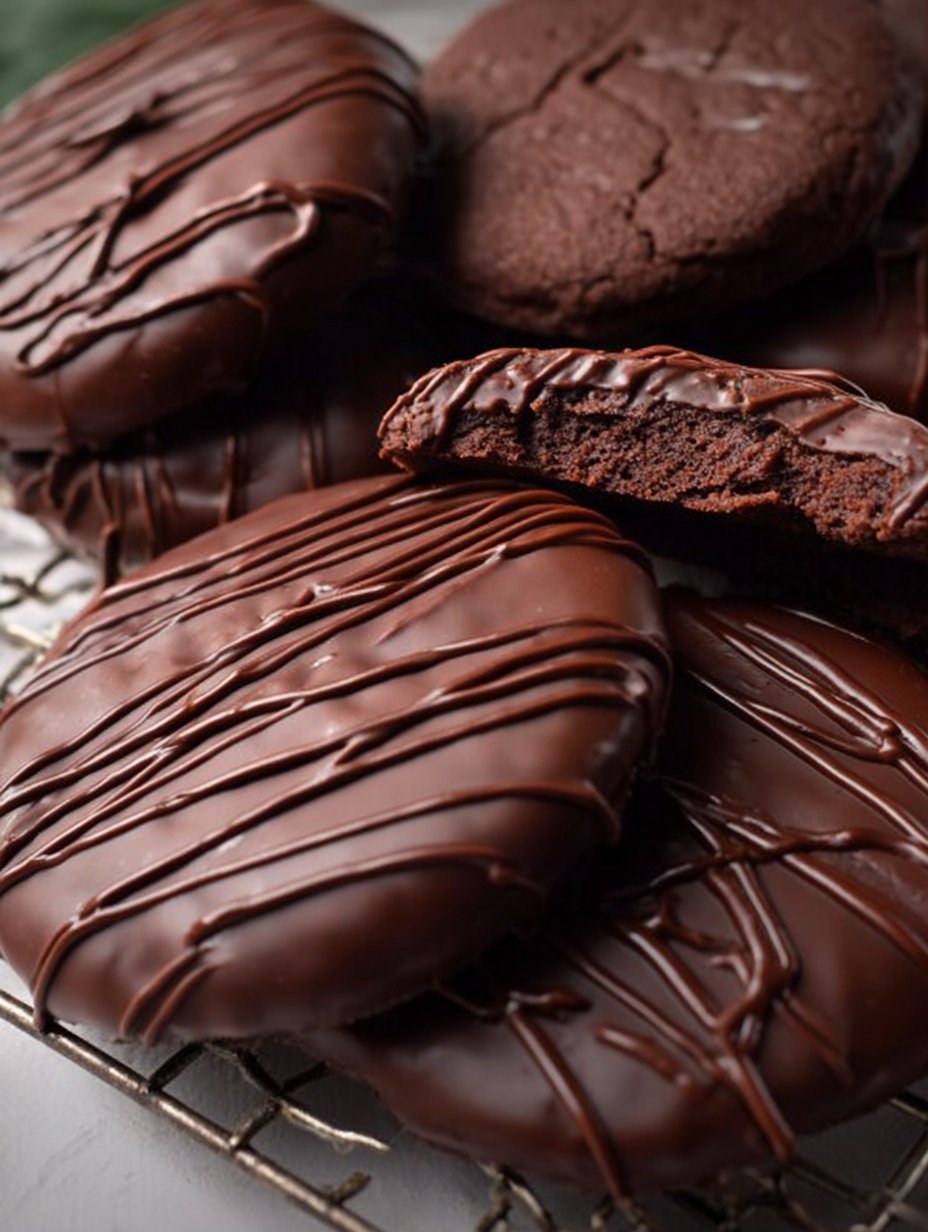
Healthy Homemade Thin Mint Cookies arrive thin, cool and mint-bright, a spoonful of cocoa that snaps then softens on the tongue.
This recipe pares ingredients to a few clean elements so the mint and chocolate sing without heaviness, and it rewards a patient, chilled dough.
Find a complementary twist in our Healthy Homemade Thin Mint Cookies variations elsewhere on the site, where texture and tone shift with white chocolate and citrus.
Why This Recipe Works
Healthy Homemade Thin Mint Cookies balance almond flour’s tender, slightly crumbly texture with a thin, cool chocolate coating that gives a crisp first bite.
Almond flour keeps the crumb delicate while unsweetened cocoa deepens the chocolate backbone without adding grit, and a whisper of sea salt lifts the cocoa notes.
Maple syrup binds and browns gently; melted butter (or coconut oil) smooths the dough, making rolling easier and the finished cookie silky rather than sandy.
A short chill firms the dough for precise, wafer-thin rolling so each cookie stays intact through cutting, baking and dipping.
Cooling on the sheet allows almond flour to set fully; this slow cooling is the quiet technical step that prevents breakage and yields a clean snap.
Finally, a thin, even chocolate coating gives a glossy finish and a pleasant temperature contrast: slightly chilled cookie with a room-temperature chocolate shell.
Flavor and Texture
The first sensation is the precise crack of a thin edge, followed by a soft, nutty crumb that dissolves quickly.
Peppermint extract perfumes without aggression; it sits on top of a rich cocoa base and then cools the palate, accenting the almond’s sweet, rounded tone.
The chocolate coating provides a satin gloss and a satisfying resistance to the bite, while the interior stays fine and almost sandwich-like in its density.
Visually, the cookies read as elegant: uniform circles, dark cocoa, and a mirror sheen of chocolate that promises restraint rather than cloying sweetness.
Convenience and Time
Healthy Homemade Thin Mint Cookies are straightforward and predictable; once you mix, the dough behaves like a firm paste that rolls cleanly between parchment sheets.
Chill time is brief twenty minutes but crucial; it makes shaping efficient and prevents tearing during transfer.
Baking is quick, about ten minutes, then the mandatory cool time on the tray gives the crumb structure time to stabilize.
Overall, active hands-on time is low, and oven and chill windows are easy to work around busy afternoons or a calm weekend.
Diet Friendly Options
Healthy Homemade Thin Mint Cookies adapt neatly for some dietary needs without sacrificing form or flavor.
Swap butter for coconut oil to keep the recipe dairy-free, and use a neutral, minimally processed chocolate to keep the coating clean and simple.
For lower-sugar profiles, choose a dark chocolate with higher cacao and a maple syrup measured carefully so the dough still binds.
These small changes retain the cookie’s visual identity and maintain the crisp-satin contrast that defines a Thin Mint.
Ingredients
1 1/4 cup almond flour
1/4 cup unsweetened cocoa powder
1/8 tsp sea salt
1/4 cup maple syrup
2 tbsp butter
1/2 tsp peppermint extract
90-120 g chocolate chips
Step by Step Instructions
- In a large bowl, whisk together the almond flour, cacao powder, and salt. Add in the maple syrup, melted butter (or coconut oil if using), and peppermint extract. Mix with a rubber spatula until a thick dough forms.
- Shape the dough into a ball and wrap it in parchment paper or plastic wrap. Place in the freezer for 20 minutes. It is important to have cold dough or it is harder to work with when it comes to forming your cookies.
- Preheat your oven to 350°F. Line a large baking sheet with parchment paper and set aside.
- Roll the dough between two sheets of parchment or wax paper until it’s about 1/8 inch thick. You want the dough to be thin enough to resemble classic Thin Mints, but not so thin that the cookies become fragile and break when you try to pick them up.
- Use a small circular object to cut out your cookie shapes—nothing fancy is needed; I simply used the lid of a spice jar. Transfer the cutouts to a parchment-lined baking sheet. Since the cookies don’t spread during baking, you can place them closer together.
- Re-roll the dough scraps and keep cutting out cookies until all the dough is used up. I was able to make 30 cookies in total.
- Bake the cookies for 10 minutes, then remove them from the oven and let them sit on the baking sheet for 15 minutes, or until they are completely cooled. This step is important because the almond flour requires time to fully set, so don’t skip it!
- Melt the chocolate chips in the microwave, heating in 30-second intervals, and add a bit of coconut oil if needed to achieve a smooth consistency. I don’t need any sort of oil when I use the brand Hu for my chocolate.
- Using a fork, dip each cookie into the melted chocolate, ensuring it’s fully coated. Place the coated cookies onto a parchment-lined baking sheet or cooling rack. Refrigerate for about 10 minutes, or until the chocolate has completely hardened.
- If you have leftover melted chocolate and want to elevate the look, drizzle it over the cookies once the coating has set for a decorative touch!
- Now, dig in! These cookies are best enjoyed cold, in my opinion!

Tips and Tricks for Success
Keep the dough cold for easy handling; warm dough sticks and tears, cold dough rolls evenly to the desired 1/8-inch thickness.
Use fine-mesh cocoa for the smoothest crumb and to avoid any grit under the tongue it refines the texture and deepens the chocolate color.
Trim the cookie edges only once the chocolate has set if you want perfect circles; otherwise, small irregularities add a handmade charm.
When dipping, work with a few cookies at a time so the chocolate remains fluid and glossy, and refrigerate briefly to set the sheen.
Ingredient Swaps
Swap butter for coconut oil without changing the cookie’s silhouette; flavor shifts very slightly toward tropical notes but the structure remains.
For a nut-free option, almond flour can be replaced with a finely ground sunflower seed flour, though color will shift and the cookie may darken.
Use a vegan chocolate to keep the recipe dairy-free and still glossy and firm after chilling.
If peppermint extract is strong for you, halve it; the cookies keep their character at lower intensities.
Pairings and Serving Suggestions
Serve these cookies slightly chilled alongside a bright, herbal tea or an espresso that cuts through the mint’s coolness.
A small scoop of vanilla bean gelato offers a creamy counterpoint to the crisp cookie and glossy shell, balancing temperature and texture.
For a holiday platter, layer the cookies with shortbread and citrus biscuits for contrast in weight and flavor; the Thin Mint’s color anchors the display.
For an easy cross-reference, try this with Bill’s Chocolate Chip Cookies if you want a softer, chewier foil to the thin mint’s snap.
Storage and Make Ahead Tips
Healthy Homemade Thin Mint Cookies keep best refrigerated in an airtight container; the cool keeps the filling firm and the chocolate glossy.
Layer with parchment to prevent sticking, and try to consume within three to four days for peak texture and flavor.
You can freeze uncoated rounds on a tray, then transfer to a bag; dip and glaze from frozen, allowing a few extra minutes for the chocolate to set.
If gifting, pack in a single layer or include parchment between tiers to protect the glossy finish.
Nutrition and Health Benefits
Almond flour contributes protein, healthy fats and a lower net-carbohydrate profile compared with wheat flour, giving these cookies a satiating quality.
Maple syrup provides a single, less-refined sweetener that delivers minerals and a gentle caramel note, used sparingly here.
Dark chocolate brings antioxidants and a concentrated cocoa flavor that lets you use less sugar overall while preserving richness.
For specific dietary needs, please consult a qualified health professional.
Mistakes to Avoid
Don’t skip the chill warm dough is the main culprit for cracked, misshapen cookies that are hard to handle.
Avoid over-rolling: thinned too far, the cookies lose their structural snap and become fragile when coated.
When melting chocolate, use short intervals and stir between bursts to prevent burning; a scorched chocolate will ruin the finish.
Allow the cookies to rest on the baking sheet after baking; pulling them too soon leads to crumbling because almond flour needs time to set.
Personal Closing Thought and Call to Action
These cookies reward a calm, exact approach: measured ingredients, a short chill, and a steady hand for dipping.
Share a photo if you try them the thin, glossy discs look beautiful on a dark platter or against linen, and I’d love to see your finishes.
Conclusion
Healthy Homemade Thin Mint Cookies are a refined, small-bite dessert that balances almond softness with a crisp chocolate shell and a closing cool mint. For a plant-forward take and further technique notes, see Healthy Homemade Thin Mint Cookies.
FAQ
What is the preparation time for this recipe?
The preparation time usually takes about 15 to 20 minutes depending on experience and equipment.
Can I substitute any ingredients?
Yes, Healthy Homemade Thin Mint Cookies can be adapted with simple substitutions such as coconut oil for butter, or a high-quality vegan chocolate for the coating depending on dietary needs or availability.
Is this recipe suitable for specific diets?
This recipe can be adapted with small changes depending on preferences.
How should leftovers be stored?
Store leftovers in an airtight container in the refrigerator and consume within two to three days.
Can I prepare this recipe in advance?
Many steps can be prepared ahead of time to simplify busy cooking days.

Healthy Homemade Thin Mint Cookies
Delicate and crisp cookies with a refreshing mint and rich chocolate flavor, perfect for a guilt-free treat.
Total Time: 30 minutes
Yield: 30 cookies 1x
Ingredients
Scale
- 1 1/4 cup almond flour
- 1/4 cup unsweetened cocoa powder
- 1/8 tsp sea salt
- 1/4 cup maple syrup
- 2 tbsp butter (or coconut oil)
- 1/2 tsp peppermint extract
- 90–120 g chocolate chips
Instructions
- In a large bowl, whisk together the almond flour, cocoa powder, and salt. Add the maple syrup, melted butter (or coconut oil), and peppermint extract. Mix until a thick dough forms.
- Shape the dough into a ball, wrap in parchment or plastic wrap, and freeze for 20 minutes.
- Preheat the oven to 350°F (175°C) and line a baking sheet with parchment paper.
- Roll out the dough between two sheets of parchment to about 1/8 inch thick.
- Use a small circular object to cut out cookie shapes and transfer to the baking sheet.
- Re-roll dough scraps to cut out additional cookies until all dough is used.
- Bake for 10 minutes, then let cookies cool on the baking sheet for 15 minutes.
- Melt chocolate chips in the microwave, heating in 30-second intervals until smooth. Dip each cookie in the melted chocolate and place on a parchment-lined sheet or cooling rack.
- Refrigerate for about 10 minutes until chocolate has hardened.
- Enjoy cookies slightly chilled!
Notes
Dough should be kept cold for easy handling. Use fine-mesh cocoa for the best texture.
- Prep Time: 20 minutes
- Cook Time: 10 minutes
- Category: Dessert
- Method: Baking
- Cuisine: American
Nutrition
- Serving Size: 1 cookie
- Calories: 150
- Sugar: 6g
- Sodium: 50mg
- Fat: 8g
- Saturated Fat: 4g
- Unsaturated Fat: 3g
- Trans Fat: 0g
- Carbohydrates: 15g
- Fiber: 2g
- Protein: 3g
- Cholesterol: 5mg
Frequently Asked Questions
Can I make these cookies gluten-free?
Yes, you can make these Healthy Homemade Thin Mint Cookies gluten-free by using almond flour, which is already gluten-free.
How can I store leftover cookies?
Store any leftover cookies in an airtight container in the refrigerator for optimal freshness. They’ll keep well for about three to four days.
Can I use a different sweetener?
Absolutely! If you prefer, you can substitute maple syrup with honey or agave syrup, though the flavor might vary slightly.
What’s the best way to melt chocolate?
The best way to melt chocolate is in the microwave, using 30-second intervals and stirring between each until smooth. This ensures even melting.
Are these cookies suitable for kids?
Yes, these Healthy Homemade Thin Mint Cookies are great for kids! They’re a fun treat that everyone can enjoy.
Final Thoughts
Try serving these Healthy Homemade Thin Mint Cookies with a cup of herbal tea or even some vanilla gelato. They’re best enjoyed chilled, so feel free to make a big batch and share! Also, don’t miss my Twix Cookies or Best Peppermint Cheesecake Cookies for more delightful treats.